Tuesday, September 11, 2018

September meeting reminder


Tonight is our first meeting of the 2018-19 season! The rain should be clearing up in time for our 7pm meeting at our usual spot, the SouthWest Mission in Verdun (corner of Verdun and Melrose).

A few things we will be discussing:

  • Collection of dues for the new year ($40 per member)
  • Collection of the completed Palliacco quilts
    • Guild labels will be available for application at the meeting. If you wish to use one, please bring a waterproof marker and white thread and needle. 
  • Collection of the QuiltCon 2019 charity challenge blocks
    • We will be discussing next steps in the process.
  • Andrea Tsang Jackson workshop
  • Announcement of a swap (yay!)
  • Lots and lots of Show and Tell :) 
Bring a coffee, bring some handwork and join us for a relaxed and quilty meeting. Looking forward to starting a new year with you all, see you tonight! 

Tuesday, August 21, 2018

September meeting

Don't freak out!!! Summer isn't over just yet... we still have weeks of lovely warm weather ahead of us. But... September is just around the corner, which means our meetings are starting back up soon!


Our first meeting of the 2018-19 year will be Tuesday, September 11th at 7pm in our usual meeting space at the SouthWest Mission, corner of rue Melrose and rue de Verdun in Verdun. We have updated the guild's Facebook Events page with all of the meetings and sew-ins for the year, and as always you can find the agendas for each meeting in the Members Only section of the blog. (The new year's password will be given out at the September meeting :)

We will be collecting the finished 2017-18 charity quilts, if you have done one please make sure you bring it. We will be arranging delivery of the quilts to Palliacco after the meeting, so September 11th is the firm deadline. Don't forget to label your work! Also, as discussed in June, we will be collecting the wonky star blocks for the upcoming QuiltCon 2019 charity quilt. If you haven't made any up yet but still want to contribute, there is still time... please see the blog post for the guidelines and bring your finished blocks to the meeting. If you are interested in contributing to the 2019 quilt in a different way (basting, quilting, binding, etc), let us know!

We will be devoting as much time as possible at the meeting to show and tell so everyone can catch up on what they did over the summer break. Bring along those projects to show off! Looking forward to seeing everyone! :)


Saturday, August 04, 2018

Reminder - Charity Sew-In August 11th

Just a quick reminder, we have our final Sew-In for the QuiltCon 2019 Charity Challenge coming up next Saturday, August 11th from 3pm to 7pm at Craft de Ville (2065 rue Parthenais, buzzer #557).

Block and photo by Diane Cote

Materials and refreshments will be provided, or you can bring something to share. This is a great scrap-buster project, so raid those scrap bins! Remember, the theme is small piecing, so no scrap is too small to be included.

It will be a fun afternoon of socializing and sewing for a good cause. You can check the Facebook event for more details, to RSVP to the event, or to ask questions. Hope to see you there!

Thursday, June 14, 2018

QuiltCon 2019 Charity Quilt Challenge

At our June meeting the other night, we had a lively discussion regarding next year's charity project and what we wanted to do for it. After much debate, we agreed we would be participating in the MQG QuiltCon Charity Challenge in 2019!

The theme this year is Small Piecing, and we thought that might suit us well as it would allow the participants to work on their contributions over the summer break, rather than having to hustle when we reconvene in September to try and complete the whole process by January for the QuiltCon deadline. So instead, we ask that those who wish to participate make one or more blocks following the guidelines listed below. The small nature of the blocks allows members to either shop from their stash or purchase fabric (please keep to the chosen color palette) without needing to use a large amount of fabric. This is a great scrap-buster project!

BLOCK: The block we will be making for this quilt is the Wonky Star block, which is an improvisational version of the Sawtooth or Eight-point Star block. It is approachable, forgiving and open to a very wide array of creative variations:  

Wonky star block by Wombat Quilts

FABRICS: The color palette for this challenge is set by the MQG and the palette they have chosen this year is as follows -  

Click to enlarge

For our block, we decided that the background of the blocks should be white or off-white with the stars being any combination of the remaining five colors. You do not have to use all of the colors in the palette! Careful choice of color can be used to make your small piecing really pop. 

Either solids or prints (or a combination of both) are perfectly acceptable. For the background fabrics, we encourage you to choose very low volume or tone-on-tone prints in white or off-white that will lend the finished product a scrappy but harmonious feel.

If you need a fabric-based point of reference, the coordinating solids would be:
  • Kona Cotton : White, Bone, Pool, Honeydew, Petunia, Violet, Purple 
  • Michael Miller Cotton Couture : Bright White, Soft White, Sea Foam, Limeade, Rose,  Lavender, Hyacinth
  • Moda Bella : White, Eggshell, Seaglass, Kiwi, Petal Pink, Amelia Purple, Purple

SIZE: You may choose from a 3 1/2", 6 1/2" or 12 1/2" block. Your block may contain a single star or multiple stars, the star can be centred or offset, it can be laid out horizontally or on point. Regardless of the layout you choose, you must incorporate fabric of less than 1" width as an integral part of your design. Yes, you read that right, less than 1"... the theme is small piecing, after all! The MQG post summarizes it nicely: "Let’s say that small piecing would incorporate fabric pieces that are smaller than 1” in either width or length. So you might picture long, skinny strips, or little tiny squares, for example. [...] Small piecing must be an integral part of the design."

The possibilities are limited only by your imagination, but here are a few examples to get your creative juices flowing:

Multi wonky star by the Running Thimble

Wonky 9 patch by Nido Quilters
 
On point wonky star by Melissa Loves Color

If you need a bit more detailed instruction, here are a few tutorials that may be helpful:
If you have a favorite wonky star tutorial or video, feel free to share it in the comments below!

CONSTRUCTION AND DEADLINE: If you wish to contribute a block (or more) to the project, we ask that you make your blocks over the summer break and bring them to the September meeting. We will be collecting the individual blocks at that time so we can move on to design and construction of the finished quilt top so that we have time to get it quilted and finished in time for QuiltCon. 

For those who would like to make use of fabric supplied by the guild for the project, or who would rather work as a group, Craft de Ville will be hosting two 'Crafternoons' specifically for this project, one on July 7th and one on August 11th. You are invited to come by and spend a bit of time socializing and sewing up some wonky star blocks. Supplies will be provided, but you are also welcome to bring along your machine and/or scraps to share with others. 

So there is your homework for the summer break! Raid the scrap bin for the colors the MQG chose and throw together a wonderfully wonky star block. If you'd like to share your blocks on Facebook or Instagram, please tag us so we can see and share your lovely work! 

Tuesday, June 05, 2018

June meeting reminder

F1 is taking over downtown this week, which means summer is about to begin, which means our June meeting is upon us! Our last meeting of the 2017-18 year is next Tuesday, June 12th at 7pm at the SouthWest Mission space in Verdun. 

Mod Melons pattern by Suzy Quilts

We will be wrapping up the year by discussing the results of the annual survey and discussing some of the plans for next year. We will also be raffling off all the goodies we've been collecting all year, having a quilty swap meet and enjoying a potluck. If you plan on bringing something, please take a moment to add your dish to the sign-up sheet. Hope to see everyone next week! 

Monday, May 21, 2018

Sew-In Reminder!

Just a quick reminder, our last sew-in of the 2017-18 year will be this coming Saturday, May 26th from 10am to 4pm at the CRCS St-Zotique. The forecast for Saturday shows warm but rainy, a perfect afternoon to stay inside and do some sewing! Bring your projects along and join us for the last sew-in of the season.


For those that are interested, Izzy will be giving a demonstration on free-motion quilting and sharing some of her tips and tricks. If you would like to learn how to do it, or are just looking for some tips or inspiration, join us for her demo after lunch.

Hope to see you on Saturday!

Thursday, May 10, 2018

Skillbuilder 2017-18 - Wedding Ring by Fiona Nanson

The Romantic Double Wedding Ring Quilt Tradition 

(Click for a larger version)
Though the pattern was first published in the United States in the early 1920s, the quilt pattern can be found as early as the late 19th Century. The Double Wedding Ring quilt pattern has long been a symbol of love and romance with its interlocking rings symbolizing marriage. The quilt was traditionally made by mothers and grandmothers for their children and given as gifts on their wedding day or anniversaries. Due to the popularity and romantic history of the quilt, many families treasure these quilts and pass them from generation to generation.


Love and Quilting in the Depression Era

The pattern was especially popular during the Depression era, as it could be created using scraps of fabric from unused bedding or other projects. The same method can be used for your modern version if you’re looking to pair down the amount of scraps in your workplace or want to keep the pattern less formal than the more traditional colour scheme.

Regardless of the fabric it was made of, old American folklore suggests that a marriage was blessed if the couple spent their first night together under a Double Wedding Ring quilt, signifying its importance as a traditional wedding gift. It’s doubtful that you’d catch any children playing on such a quilt during this time, due to its importance.


A Modern, Creative Twist on an Old Quilt Pattern

Modern quilters have taken the traditional quilt design and added their own creative inspiration to it. While each quilt still maintains the appearance of the interlocking rings, diverse types and sizes of fabric can create a design that’s unique to the taste of the quilter. Many quilters have also bucked tradition by using a different, bolder colour than white, such as black or blue, for the background. The nontraditional colour choice gives the entire quilt a much quirkier vibe.

(Click for a larger version)
Due to the complexity of the pattern, the Double Wedding Ring quilt might be a hard one for beginners to attempt. It includes a lot of moving parts and can be frustrating on the first try but if you stick with it, you’ll be left with a gorgeous quilt that you can give as a gift to the loved ones in your life. Some quilters have even pulled together heirloom scraps of baby clothes and other cherished pieces of fabric add another sentimental element to the anniversary quilts made in this pattern.

(Click for a larger version)
If you’re getting bogged down by trying to create a fresh take on an old favourite, just stick to the original pattern and try out varied colour schemes or pull from your scrap pile. 

(Click for a larger version)
Regardless of your spin on the design, the circular pattern set against an open background makes for a pleasing piece of patchwork that will be an enduring staple in your home.

For some tips on making a Double Wedding Ring Quilt, check out this post:  http://www.joscountryjunction.com/tips-for-double-wedding-ring-quilt/

Quilt Alliance's Modern Wedding Ring pattern


Thursday, April 12, 2018

April 2018 Mtl MQG Meeting Minutes

April 2018 Mtl MQG Meeting Minutes

April 11, 2018 at 7pm SouthWest Mission, Verdun, QC

Business:
  • Riley Blake fabric challenge: the MQG will mail the bundles to Claudia, but they will not be in time for the deadline.
  • Humboltd Broncos: the Saskatoon MQG is organizing a quilt drive for the people affected by the bus crash. They are looking to collect 200 quilts. If you'd like to contribute or get more information, go to the https://saskatoonmqg.com/quilts-for-broncos/ website.
  • Charity Quilt: our charity quilt from 2 years ago will be donated to the Syrian family during a presentation on April 29 at 12:30 PM. Check your email for all the details.
  • Volunteers for the Executive: we are always looking for people who would be willing to become a member of the Executive Team. Not a huge time investment and lots of fun. If you are interested, please speak to any member of the current team.

Tuesday, April 10, 2018

Skillbuilder 2017-18 - Drunkard’s Path by Shannon Fraser


Hi my fellow quilters! I'm Shannon from Shannon Fraser Designs popping in to talk about all things Drunkard's Path!!

Being a history buff, the Drunkard’s path block was an interesting past to delve into!

The design is believed to have originated in ancient Egypt but was popularized in the late 19th century by quilters in the American colonies. This is where it gets a little interesting.

One story says that Drunkard’s path quilts were used to help guide slaves to freedom from the Underground Railroad. Different coloured squares would help guide their path to safety. Although this is highly debated.  Another theory is that women used the design during the Women’s Temperance Movement in the early 20th century as a way of making their opinions known and trying to bring influence when they couldn’t vote.

The block itself is even known by many names such a Solomon’s Puzzle, Rocky Road to Kansas, Oregon Trail, with the most popular being Drunkard’s Path. The latter is said to have been attributed as the design of the block looks like a drunk person stumbling home.

Whatever the history, what we can agree on is how fun this quilt block is to play with!

THE TRADITIONAL BLOCK


The traditional block design features one “hill” against a solid background. Traditionally, the colours used in this quilt design were blue or red against a white background.

Circles can be a source of stress for a lot of quilters, but piecing the block is quite easy – you just need to take your time with it!

Materials Needed for the Traditional Drunkard’s Path Block


Drunkard’s Path ruler or self-made template
Fabric (1) large square at least 7" and (1) smaller square 5 ½" 
Pins
Rotary Cutter


To keep everything aligned, the key here will be accurate cutting and piecing. Plus, pins will most definitely be your friend when piecing the traditional block!

Here’s how to do it:


Start by cutting the “L” shape of your Drunkard’s path block from the 7" block.
Lay the template so it is flush with the bottom left corner.
Carefully cut along the curved edge of the template.
Set aside.


Repeat the same process with the 5 ½" square using the “pie” template.


Fold the “L” and “pie” shapes in half finger pressing, being careful not to pull or stretch the fabric.
Lay the “L” piece on top of the “Pie” shape lining up the folds. Pin.
Now pin each of the corners, making sure to line up the square edges.


Continue pinning in between these pins.
Stitch in place using a ¼" seam allowance. Take your time!
Set your seam with a hot iron, and press towards the “L” shape.


Voilà – you’ve made a Drunkard’s Path block!!

You can add as many “hills” as you want and it’s all achieved using the above method. Once you know the technique, you can apply it to any size Drunkard’s Path block.


LARGE DRUNKARD’S PATH BLOCK


To make a really big version, you often won’t find a template large enough for your needs. Nothing a large plate can’t fix!

Materials Needed


Large plate
Fabric (1) 13" square and (1) 9" square
Rotary Cutter

Here’s how to do it:


Start by laying your large 13" square out on your cutting mat. Using a large plate, align the edge of the plate along the 7 3/4" horizontal line on my mat and 8 1/2" along the vertical line. With your rotary cutter, cut along the edge of the plate. This creates your “L” shape.

Use the “Pie” you cut from the “L” shape as a template to cut your “Pie” from your 9” square. Lay the square out on the cutting mat, place the “Pie” on top and carefully cut along the edge.
Stitch together using the traditional pinning method described above.

Square up to 12 ½".


The technique is the same no matter what size block you want to achieve!


MODERN IMPROV BLOCK


What I particularly love about the Drunkard’s Path is approaching it with an improv flare.
This version abandons all use of templates and rulers to rely on your own freehand cutting style (the latter gets developed more and more with practice).

Materials Needed for the Modern Improv Drunkard’s Path Block


Fabric
Rotary Cutter
Imagination 😉

Here’s how to do it:


I love that this approach doesn’t require many tools. There is no precise cutting here and I forgo any pinning as well. Here’s a video to help show you exactly how you can use this technique too!

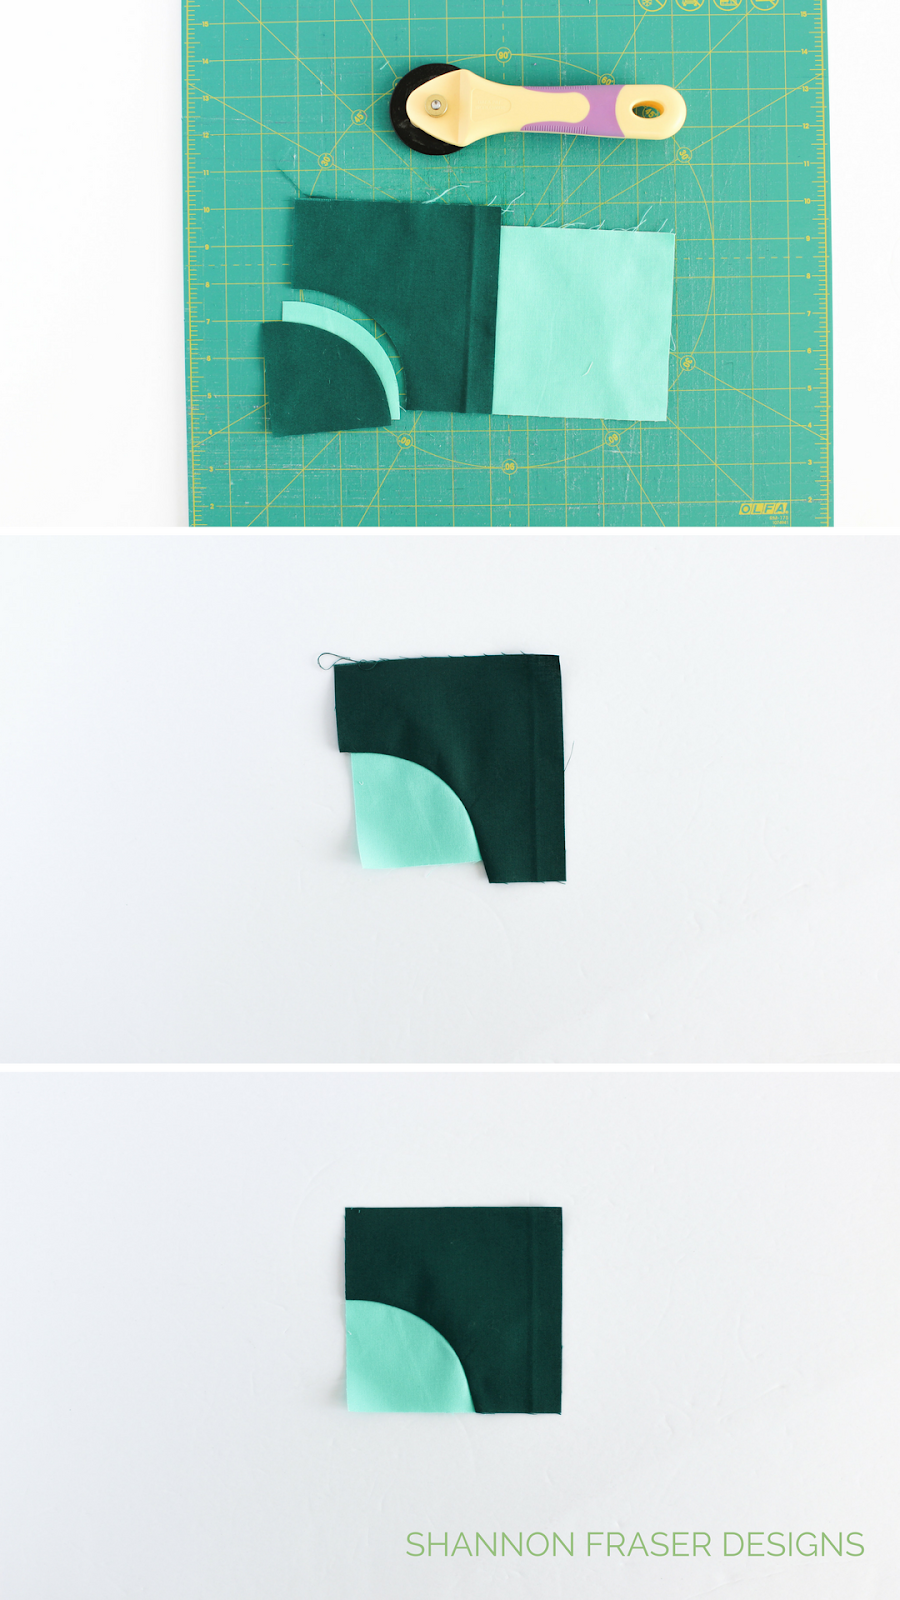
To make more at once, I like to stack a couple of fabric squares on top of one another before I start cutting.

Next, using my rotary cutter, I haphazardly cut a semi circle from one edge of the block to the other. Don’t worry if your line is wonky or uneven – that ads to the charm, in my opinion.

Now swap the mini circles with the larger “L” shaped pieces. Always working with the “L” shaped piece on top, line it up with the edge of your mini circle. Take a few stitches and then gently ease the top fabric edge along the curved edge of the bottom piece of fabric.

Go slow here.

You don’t want to pull or stretch the fabric into place, but rather just gently place it in alignment. Take a few stitches. Stop and arrange the fabric. Keep going until you get to the end.
Make sure the top and bottom fabric are flat, so you avoid any puckers.

Since we’re working without templates, we haven’t accounted for seam allowances which is why the edges won’t align (second photo below). Nothing a little trimming can’t fix 😉

When it comes to ironing, I find it best to first set your seam and then press away from the inner circle. I find this always helps ease out any bumps you may have created while stitching.


GET PLAYFUL


Now that know how to piece the block, the real fun can begin!

Here is where you need to let your imagination run free and think outside the box.

This is a traditional block with an added “hill”. You can add as many “hills” as you want for a very different look.


A few additional block examples I’ve made:


NOW IT'S YOUR TURN!


Now it's your turn to create a modern take on the Drunkard's path block! Share your blocks on Facebook or Instagram, and feel free to tag the Montreal Modern Quilt Guild and/or use the hashtags: #mtlmqgskills  or  #mtlmqgskillbuilder

I've loved walking you through this tutorial. For some more inspiration please check out my Circles and Drunkard's Path board on Pinterest.

Be sure to reach out if you have any questions. You can find me on Instagram, Facebook and over on my site Shannon Fraser Designs.

Happy quilting!

Shannon

Thursday, April 05, 2018

EPP Hexie Lottery

Last meeting we swapped warm and cool charm sqaures!  The rainbow that we got was rather lovely.


At the May meeting (so there is still some time) we will be have a EPP hexie lottery. To participate, 4 x 1" English Paper Pieced hexies will get you 1 entry. Make more hexies and get more entries! If we get a very large quantity of hexies, we may create more than 1 lot.

You do not need to use the charms from the last swap. However charm squares can be cut into mini charms (2.5" squares) and they are the perfect size to make 1" hexagons with! You can use scraps, strips from jelly rolls or whatever fabric you would like! There is no colour or print restrictions for the lottery. However, please only submit hexies made of quilting cotton.

Another thing to ask is that the basting stitches only go through the fabric and not through the paper (makes it easier to pull out the paper without having to cut the basting threads)


The important thing to note, is that the edges of the hexagon is 1". There are a bunch of different templates out there. Everyone will agree that is the hexagons are set up in rows versus nested it makes cutting the paper templates much MUCH easier. I found a free template on Geta's Quilting Studios. The PDF have 6 different sizes, so please mach sure you are using the 1" (and that you are printing at 100%, not scaled to fit!)

Enjoy making your hexies! They are a great little project to do in a waiting room or while watching TV! The lottery will be held at the May 8th meeting.